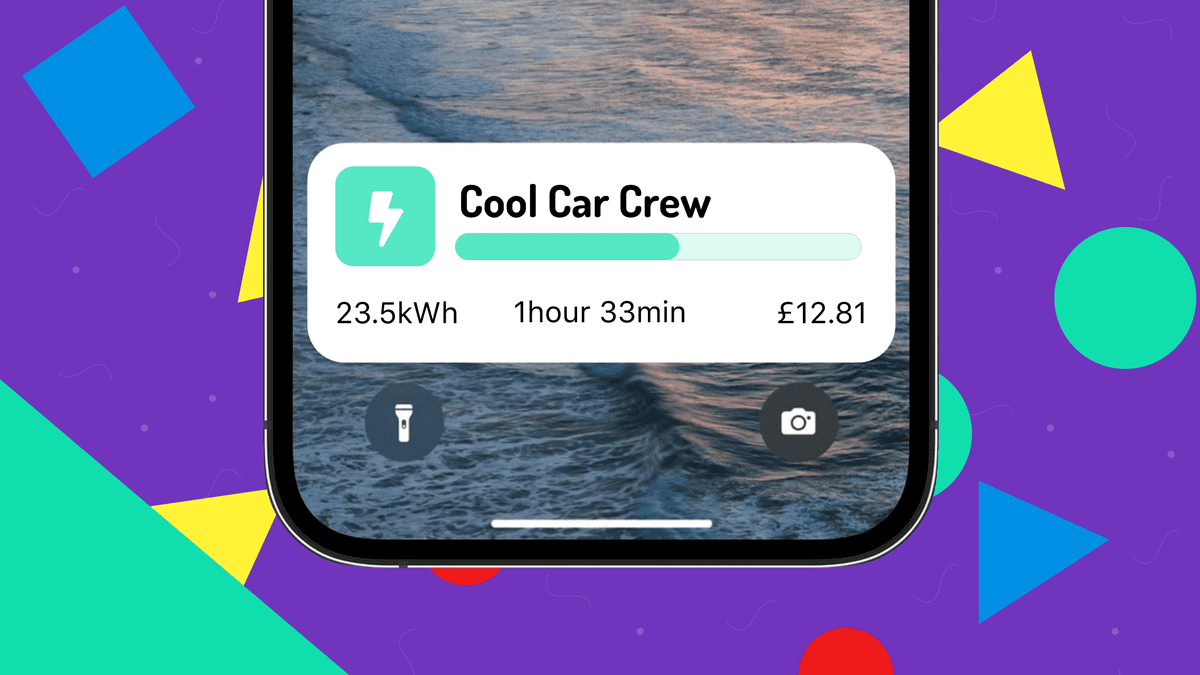
Live Activities are relatively new to the iOS ecosystem. They first appeared in iOS 16.1 back in 2022 and have proven to be one of the most engaging features introduced by Apple in recent years. Live Activities allow us to display real-time updates and information on the iPhone Lock Screen and in the Dynamic Island. We've recently added these to mobile apps both in a native SwiftUI app and in a React Native app. In this guide, we'll walk through the latter approach of implementing Live Activities in your React Native application which has a few more challenges and considerations than compared to the native SwiftUI approach.
What are Live Activities?
Live Activities provide real-time updates about ongoing events in your app directly on the iPhone Lock Screen and in the Dynamic Island (on iPhone 14 Pro and newer models). Common use cases include:
- Updates from your EV charging app on your cost and charging status
- Countdown from your parking app of how long you have left to park
- Delivery tracking and ride-sharing status from apps like Uber and Lyft
- Sports scores and live match updates
- Timer countdowns
- Flight status updates
In all honesty it's a really useful feature and thoughtful piece of user experience to have glanceable real-time updates on your lock screen or up in the Dynamic Island. If you ask me Live Activities are massively underused and could help your app stand out in the crowded App Store.
Prerequisites and assumptions
Before we begin, ensure you have:
- React Native project targeting iOS
- Xcode 14 or later
- iOS deployment target of 16.1 or higher
- Basic knowledge of Swift and iOS development
We're assuming there's an existing React Native app that you're looking to add Live Activities to and you're comfortable with the 'native' aspects of React Native development. We're also assuming that you're using a backend API to fetch data for your Live Activities and we have a vanilla React Native app with no abstractions like Expo or EAS.
Getting started with Live Activities
First, we need to enable Live Activities in your iOS project:
- Open your iOS project in Xcode
- Select your target's signing & capabilities
- Add the "Push Notifications" capability
- Enable "Support Live Activities" in your target's Info.plist:
<key>NSSupportsLiveActivities</key>
<true/>
Creating the Widget Extension
Live Activities require a 'Widget Extension' target in your iOS project:
- In Xcode, go to File > New > Target
- Select "Widget Extension"
- Name it something like "LiveActivityExtension"
- Create your Activity's interface using SwiftUI
NB: The addition of the Widget Extension will have its own bundle identifier and will require changes to your CI pipeline to build and deploy the app.
Now let's set a context for our Live Activity. We're developing an EV charging app using React Native. The EV charging session could last 30 minutes plus so let's give some useful glanceable information to the user using our Live Activity:
import WidgetKit
import SwiftUI
import ActivityKit

struct ChargingAttributes: ActivityAttributes {
    public struct ContentState: Codable, Hashable {
        var sessionDuration: TimeInterval
        var kilowattHours: Double
        var cost: Decimal
        var status: String
    }

    var chargingPointId: String
    var startTime: Date
}

struct LiveActivityWidget: Widget {
    var body: some WidgetConfiguration {
        ActivityConfiguration(for: ChargingAttributes.self) { context in
            // Your Live Activity View
            VStack {
                Text("Charging at #\(context.attributes.chargingPointId)")
                Text("Status: \(context.state.status)")
                Text("Duration: \(context.state.sessionDuration.formatted())")
                Text("Energy: \(context.state.kilowattHours, format: .number) kWh")
                Text("Cost: £\(context.state.cost, format: .currency(code: "GBP"))")
            }
        }
    }
}
Coming from a pure Javascript background? The above might look daunting but it's actually quite simple. We're using a simple SwiftUI view here (the VStack and Text) which is probably the easiest way to get started with native views, especially if you're coming from React. SwiftUI is declarative and should feel familiar to React developers. Apple has a lot of great guides and WWDC sessions to help you get started with SwiftUI.
Bridging Native Swift to React Native
To control Live Activities from React Native, we need to create a native bridge. Create a new Swift file:
import Foundation
import ActivityKit

@objc(LiveActivitiesModule)
class LiveActivitiesModule: NSObject {

  @objc
  func startChargingActivity(_ chargingPointId: String,
                            status: String,
                            startTime: Date,
                            resolver: @escaping RCTPromiseResolveBlock,
                            rejecter: @escaping RCTPromiseRejectBlock) {
    let attributes = ChargingAttributes(
      chargingPointId: chargingPointId,
      startTime: startTime
    )
    let contentState = ChargingAttributes.ContentState(
      sessionDuration: 0,
      kilowattHours: 0,
      cost: 0,
      status: status
    )

    do {
      let activity = try Activity<ChargingAttributes>.request(
        attributes: attributes,
        contentState: contentState
      )
      resolver(["activityId": activity.id, "pushToken": activity.pushToken])
    } catch {
      rejecter("error", "Failed to start activity", error)
    }
  }
}
Then we need to create the corresponding JavaScript module:
import { NativeModules } from 'react-native';

const { LiveActivitiesModule } = NativeModules;

export const startChargingActivity = (
  chargingPointId: string,
  status: string,
  startTime: Date
): Promise<{activityId: string, pushToken: string}> => {
  return LiveActivitiesModule.startActivity(
    chargingPointId,
    status,
    startTime
  );
};
Updating Live Activities
There are two main approaches to updating Live Activities.
- The Widget Extension can be thought of as its own little runtime. We could use this to make HTTP requests directly to your backend.
- The alternative approach is to use push notifications to update the Live Activity
My advice (if possible) would be to use push notifications for updates. This is the recommended approach, will reduce battery drain for your users and avoids potential authentication challenges that come with the Widget Extension making requests to your backend.
1. Direct HTTP Updates (Widget Extension Requests)
In this approach, your Live Activity extension makes HTTP requests directly to your backend.
struct ChargingActivityWidget: Widget {
    let url = URL(string: "https://api.yourbackend.com/charging-updates")!

    var body: some WidgetConfiguration {
        ActivityConfiguration(for: ChargingAttributes.self) { context in
            ChargingActivityView(context: context)
                .task {
                    do {
                        let (data, _) = try await URLSession.shared.data(from: url)
                        // do something with the response and update the activity
                    } catch {
                        print("Failed to fetch updates: \(error)")
                    }
                }
        }
    }
}
Advantages:
- Simpler initial implementation
- No need for push notification infrastructure (if you don't already have it)
- Direct control over update frequency
Disadvantages:
- More battery intensive
- Less reliable for real-time updates
- Background fetch limitations
- May not work when device is in low-power mode
- Authentication challenges:
- Need to share authentication tokens between React Native and Widget Extension
- Token refresh flows become complex
- Separate token management required for Widget Extension
2. Push Notification Updates (Recommended Approach)
Using Apple Push Notification service (APNs) avoids the authentication challenges between your React code and Widget Extension:
struct ChargingActivityWidget: Widget {
    var body: some WidgetConfiguration {
        ActivityConfiguration(for: ChargingAttributes.self) { context in
            ChargingActivityView(context: context)
        } dynamicIsland: { context in
            // Dynamic Island view configuration
        }
    }
}
Server-side push notification handling (you can use any language you want here):
// Server-side code (Node.js example)
async function updateChargingActivity(activityId: string, pushToken: string, update: any) {
  const apns = new APNSConnection({
    cert: process.env.APNS_CERT,
    key: process.env.APNS_KEY,
  });

  await apns.send({
    token: pushToken,
    payload: {
      aps: {
        "content-state": {
          sessionDuration: update.duration,
          kilowattHours: update.kwh,
          cost: update.cost,
          status: update.status
        },
        timestamp: Date.now(),
      },
    },
  });
}
With APNS you might even be using a service like Firebase Cloud Messaging (FCM) or AWS SNS to send push notifications to your users.
Advantages:
- No authentication tokens needed in Widget Extension
- Server controls all updates
- More battery efficient
- More reliable for real-time updates and updates from external sources
- Cleaner separation of concerns
- Works seamlessly with user authentication state
Disadvantages:
- More complex initial setup
- Requires push notification infrastructure
- Network dependent
Shipping Live Activities
Now we've got a basic setup I advise we do a few things before getting into production.
Test the app on device. See how it works in the wild, test with different device states (locked, low power mode) and verify push notification delivery and check they work as expected with variable network conditions.
Once we're happy with the app we need to make sure our build process takes into account the Widget Extension. Hopefully you have CI setup with Fastlane and it won't take long at all to get this working.
Once we have the app bundle in App Store Connect remember to tell people about the new Live Activity feature in the app store listing. As I mentioned earlier I think this is a great feature that can delight users and help your app stand out in the App Store. Shout about it in the app store description but also consider adding a screenshot to the app store listing highlighting the Live Activity.
What about Android?
Android doesn't have Live Activities but as of Android 14 there are 'Live Updates', which are directly comparable to iOS Live Activities - great for showing EV charge session information or sports scores
The implementation is different from iOS - you'll use NotificationManager and LiveUpdatesManager instead of WidgetKit - so you will need to dabble in a smidge of Kotlin but the concept is similar to what we've done here for iOS. For older Android versions (pre-Android 14), you can fall back to using Foreground Services with ongoing notifications - just be mindful of battery drain.
Add Live Activities to your React Native apps
Live Activities provide a powerful way to keep users engaged with your app's real-time updates, even when their device is locked. While implementation requires careful consideration of iOS-specific requirements and authentication patterns, the end result can significantly enhance your app's user experience.
At Add Jam, we specialise in building high-quality React Native applications that take full advantage of platform-specific native features like Live Activities, HealthKit, WalletKit and more. Our experience with React Native stretches back to 2016 when we shipped our first React Native app to production. If you're looking to implement Live Activities in your React Native app or need help with any aspect of mobile development, get in touch with us. Our team of experts can help bring your new app ideas to life with the latest iOS features and best practices. Or do you have an existing React Native app you want to improve? We can help modernise and refine an existing app by using our experience to undertake a React Native code audit.
For more insights into React Native development, check out other React Native blog posts such as Using React Native Modals in 2025.


